
DIY Spring-Inspired Picture Frame Crafts
Posted by CF Style Team on on Feb 22nd 2024
For those who love DIY projects, spring offers a wealth of inspiration. As the world awakens from its winter slumber, it's the perfect time to infuse your home with the vibrant energy of the season. One of the easiest and most creative ways to do this is by crafting your own spring-themed picture frames. These unique and personalized frames can add a seasonal flair to any room, making your space feel fresh and inviting. In this blog post, we'll guide you through three delightful techniques: decoupaging with springtime images, creating pressed flower frames, and painting frames with vibrant colors.
Before we dive into DIY-ing, let's gather materials:
2. Mod Podge or white glue
3. Foam brushes
4. Spring-themed magazines or printed images
5. Pressed flowers or spring blooms
6. Acrylic paints and brushes
7. Sandpaper (optional)
8. Clear varnish (optional)
9. Old newspapers or a workspace cover
10. Soft cloth or old tshirt
Technique 1: Decoupage with Springtime Images
Step 1: Prepare Your Workspace
Start by covering your workspace with old newspapers to protect it from glue and paint.
Step 2: Select Your Images
Choose spring-themed images from magazines or print your own from the internet. Flowers, butterflies, and pastel colors work beautifully.
Step 3: Apply the Glue
Use a foam brush to apply a thin layer of Mod Podge or white glue to the front of your picture frame.
Step 4: Add Your Images
Place your selected images onto the glued surface. Smooth out any wrinkles or bubbles with your fingers or a clean cloth.
Step 5: Seal with Glue
Apply another layer of Mod Podge or white glue over the images. This will provide a glossy finish.
Step 6: Let It Dry
Allow your frame to dry completely, which may take a few hours. You can add multiple glue layers for added durability.
Optional Step 7: Sand and Varnish
For a vintage look, lightly sand the edges of your frame. Finish by applying a clear varnish for extra protection.
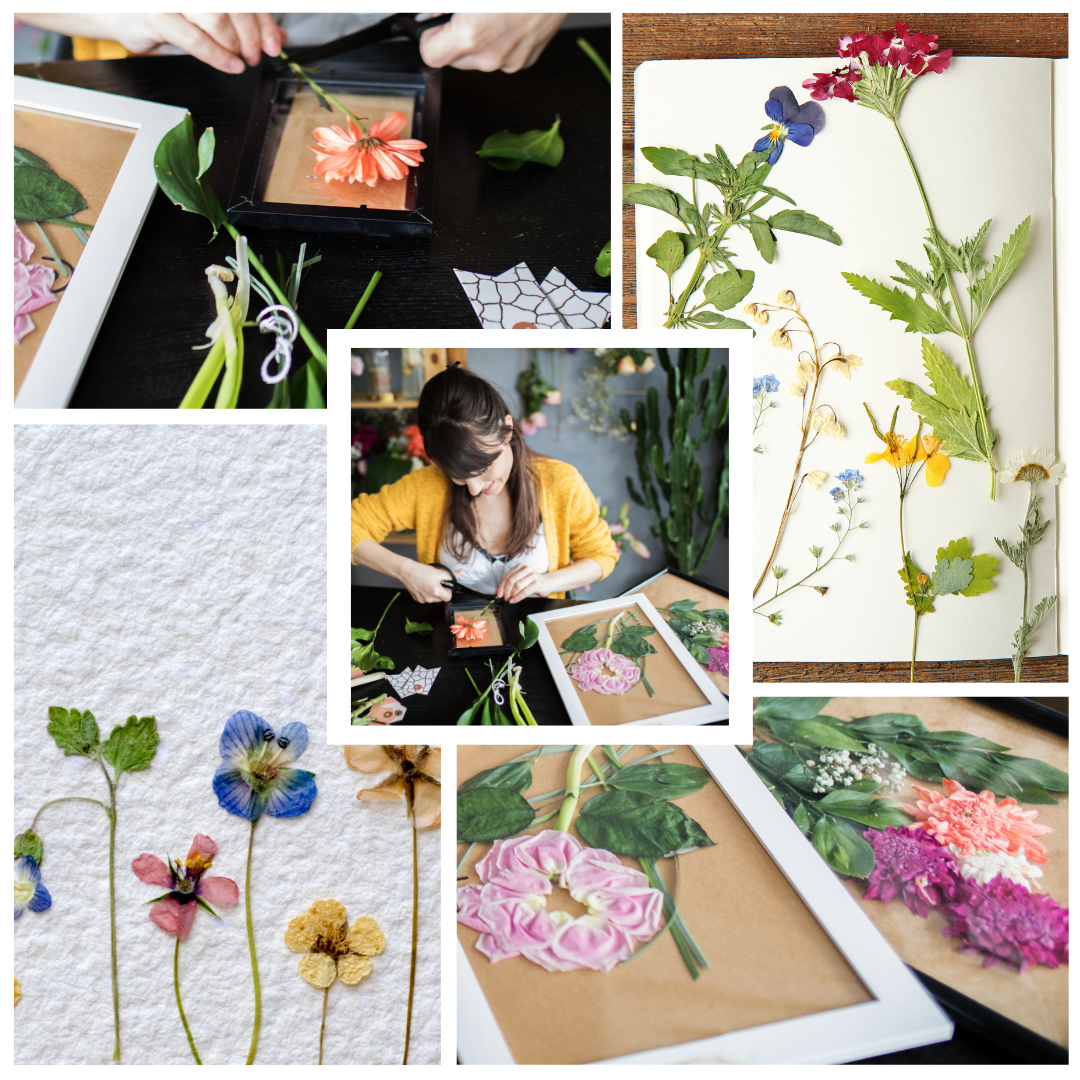
Technique 2: Creating Pressed Flower Frames
Step 1: Gather Blooms
Collect fresh spring flowers or leaves and press them between the pages of a heavy book for a few days to flatten them.
Step 2: Prepare Your Workspace
Cover your workspace with old newspapers to protect it from glue and paint.
Step 3: Prepare the Frame
Remove the glass from your picture frame. Wipe any fingerprints off of the glass with a tshirt or soft cloth.
Step 4: Arrange the Flowers
Place your pressed flowers onto the glass, experimenting with different layouts until you find one you love.
Step 5: Secure the Blooms
Use a thin layer of Mod Podge or white glue to adhere the pressed flowers to the glass. Apply the glue gently with a foam brush.
Step 6: Let It Dry
Allow your pressed flower frame to dry completely. This may take a few hours, depending on the thickness of the glue.

Technique 3: Painting Frames with Vibrant Colors
Step 1: Prepare Your Workspace
Cover your workspace with old newspapers to protect it from glue and paint.
Step 2: Prepare Your Frame
Remove the glass and backing from your picture frame, leaving just the frame itself. Clean the frame with a soft cloth or scuff it with sandpaper to ensure the paint adheres well.
Step 3: Choose Your Colors
Select your favorite spring-inspired acrylic paint colors. Pastels, bright greens, and sunny yellows work wonderfully.
Step 4: Paint Your Frame
Use a paintbrush to apply the chosen colors to your frame. You can experiment with solid colors, ombre effects or even paint delicate spring patterns like flowers or birds.
Step 5: Let It Dry
Allow your frame to dry completely. Depending on the thickness of the paint, this might take a few hours or overnight.
Finishing Touches
Once your frame is completely dry, reassemble it and find the perfect spot in your home to display your beautiful spring-inspired frame. Crafting your own spring-themed picture frames celebrates the season's beauty while adding a personal touch to your decor. Whether you choose decoupage, pressed flowers, or vibrant paint, these DIY creations will infuse your home with the joyful spirit of spring. Roll up your sleeves, gather your supplies, and let your creativity bloom!